Monday, February 11, 2013

Hurry it UP Gramma!!

Even the best nature'd of babies are 
allowed to get cranky
 when things have gone on long enough!  

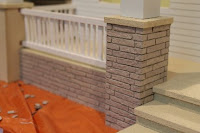
The extended *ahem* brick laying work is now completed - finally!  Finished laying/gluing the last brick yesterday and celebrated with a glass of wine. 


 After everything dried, I took an old broken dental instrument & carved in some lines into the bricks for added definition.  Then dabbed four different colours of paint on the egg cartons to give them a bit of depth and hopefully a bit of realism. 

The egg carton bricks on their own look a lot better than just plain ol' wood but my friend Casey, who I learned this technique from, takes her work to a different level by adding depth with colour so I had to follow her example and give it a try.   


                                                                             I took the colours I've already used & will be   using and watered them down.   Using cheap,     stiff brushes, I started with the tan colour that   was used on the porch and dabbed it on all the bricks.  Next I watered down the deep purplish grey colour even more and did a wash over  various areas, especially the corners and lower areas where dirt would build up.  The light grey that was used on the siding was then taken and  dry brushed over outer most surfaces which  helped give depth. The seafoam blue which will    be the front door colour was also watered down     a lot and just let to seep into the odd spot.  


After the paint dried I sprayed the bricks down with a matte finish sealer by Folk Art.  That will protect the colours already there and give the surface a little bit more of a sturdier surface.  It will also allow me to add dirty "water" washes down the road as required.

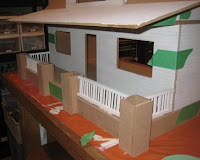
The exciting part of all this was that the next stage is on it's way - the second floor is now attached and awaiting walls!            One last word of advice - spraying sealers should actually be done in a well ventilated area....not in a downstairs studio in the middle of a winters day...
...at least it was only -6° today so having all the doors & windows open wasn't too bad....

Sunday, January 06, 2013

At This Rate...

Wow - I had really good intentions on spending the winter months working on Charlie's dollhouse and here it is January and she will be one year old soon!  Course I hadn't planned on my part time job suddenly turning into a full time one.  Ah well - at least I'll have more $ to spend when it comes time to help fill it up. :D

Since my last post, the only thing I've accomplished on it is about 2/3's of the first of two porch posts left to brick up.  Not worth taking a photo of but while the dollhouse has not changed much over the last 7 months, Charlie certainly has!   
Six months old
Halloween Monster- complete with Growls
Over the summer I got a little side tracked by Pinterest but it did help to spruce up my studio space.  I went a little crazy painting furniture... 


My Studio space where Charlie's house is (slowly) evolving is in our basement and while there is a couple windows, the newly tarted up furniture really brightens it up and makes it even nicer to spend time in. I've since done a bit of rearranging since these photo's were taken and much happier with the flow as well.  

So....that said, I do have good intentions of spending more time here and hopefully will have some progress shots for you in the near future!  

~~~

Saturday, June 16, 2012

Rocks in my Head

I know it's been quite a while between posts but I was pretty sure you wouldn't really be interested in watching various coats of paint dry. Having to fit in work of various sorts (dental, Rotary, yard, other projects etc...) stretched it out a bit as well, but finally there's some progress you can actually see.  


Making sure the walls are straight and not bowed then wait for the glue to set

Porch posts and railings - and wait for the glue to set

Insert post caps and front steps - and wait for the glue to set


Forgot to mention that before any of the porch bits were glued down I had to decide if it should be wood or concrete.  Decided to go with a concrete look to go with the porch caps and steps. All the pieces had to be painted and texturized first.


 I'm I'm thinking this look will be best with how the foundation and porch posts will be done.  


And this is where the egg cartons come in.  Thinking I have enough (thank you for your efforts Val!)

I wanted to give the house a contemporary look yet tie into it's Arts & Crafts roots.  Could have gone concrete but that would be boring and bricks wouldn't have given the right look.  Actual rocks would be way too heavy.  Egg carton rocks are light weight, sturdy and give you freedom of style.  

"My" brilliant idea came from my friend Casey who generously shares an amazing assortment of clever tips and tutorials on her entertaining blog. She is one of the most talented and versatile artists I've met. 

Do go and check her out - you'll be well entertained. Incidentally, her blog was voted Best Miniature Blog two years running. 

caseymini.blogspot.ca/search?q=rocks

Just one example of Casey's method of turning egg cartons into rocks.

Okay so it's a little time consuming but well worth the effort!  Karalee and I decided to go with a contemporary styling so went with  the long stacked cut rock you see everywhere now. In order to make life a little easier in scaling down the size, each 'rock' is a quarter of an inch by 1 3/4 inches.  Just slightly wider than they would be in real life.  I know that's not metric but when working in 1/12th scale old school is just more convenient not to mention easier.  I like easier.
One egg carton + four episodes on HGTV (2 hours) =
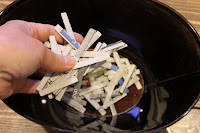
75 1/4" x 1 3/4 rocks plus about 40 smaller bits and one section of porch foundation glued.

This is what 75 rocks look like

Left overs for the recycle bin


 I stopped timing or counting after that.  
Two sections and one post done.  


View thru the door                          View from end of porch                        View from window


Loving the texture and how it looks so far and it's not even painted up 
to tie into the colour scheme and  to look like rocks yet  : )

Probably won't see me for awhile...have to go cut more rocks and carry on.  

Wednesday, May 23, 2012

Sneak Preview....

Finally a bit of excitment!   It's time for the dry fit where you make sure everything fits and see how the pieces all fit together before applying glue.  This is when you figure out if any modifications are necessary as well as mark the spots that should not have paint coverage.  This is where you get to see the actual size and get a better idea of what the l room sizes and wall area will be.  This is the point where it starts to be fun. :)


 And here it is - all held together with gravity and green painters tape.  There's still about 1000 or so pieces left in the box that will need sanding, priming, painting etc but those will wait for their proper time. 


Then it's time to take it all apart and start applying the actual paint.            Nice to see the benefits of all the sanding and priming etc.


Had room on the table so the first coat of primer went on the interior walls.  While that was drying I marked the lines on the                                          various roofing for the gazillion shingles.


It's also time to make some final colour decisions since I didn't go with the original siding colour as it turned out to be darker in person than what I wanted.  Ended up chosing the next tone down - Iced Cube Silver.

It's best to make decisions on  coordinating  colours when you can have some indirect natural lighting.   I was concerned that the original white I'd chosen wouldn't have enough of a contrast against the softer grey.  I think it's going to work out for the best though. Needed to see how they all worked together as a whole.   Made the choices and now need to go visit the nice lady at the paint store before I can go any further.


Siding - Ice Cube Silver
Trim - Decorators White
Roofing - Sea Life
Front Door - Pool Blue
Base tone for rockery - Monroe Bisque


I hope I have enough egg cartons....